Slow and Low at Bleachers Barbecue

For the past few months I’ve been dying to try out this barbecue place right across SM City Northwing, beside Nice Day carwash. They opened around the end of last year and I’ve been hearing good things about the food they serve.

So a few days ago I decided to finally try it, and surely, it was worth the drive!

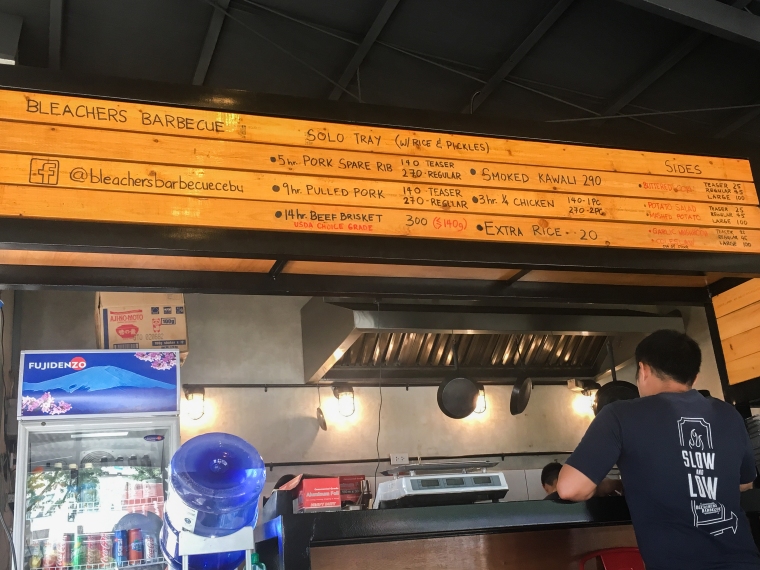
Bleachers Barbecue serves slow and low smoked American-style barbecue served with their homemade barbecue sauce. They have 5 hour Pork Ribs, 9 hour pulled pork and 14 hour beef brisket, chicken and even smoked kawali. You can also order different side dishes such as corn, salad or mashed potato.

Bleachers2.jpg

We tried their pork spare ribs and the pulled pork – both in “teaser” serving. They serve their barbecue with rice and a side of pickles.

bleachers31.jpg

Their pulled pork was delicious! It was tender and juicy and the barbecue sauce has just the right of tangy-sweet. The spare ribs was just as good. It was tender, but I don’t know if I can call it fall-off the bone kind of good since I only tried a small piece. But the ribs were definitely yummy, even without the barbecue sauce. Honestly, I don’t think you need the extra sauce because the meat was delicious as is. The serving may look small but it really is a generous serving.


Will definitely go back and try their beef brisket and maybe get another bite of their pulled pork. If you haven’t tried their barbecue or you’re just craving for something good  and tasty then head over to Barbecue Bleachers. They’re located at Kaoshiung Street, right across SM City-Northwing, beside Nice Day Carwash. They’re open from 12:00 to 9:00 PM. 


Hotel Review: Centurion Hotel Ikebukuro

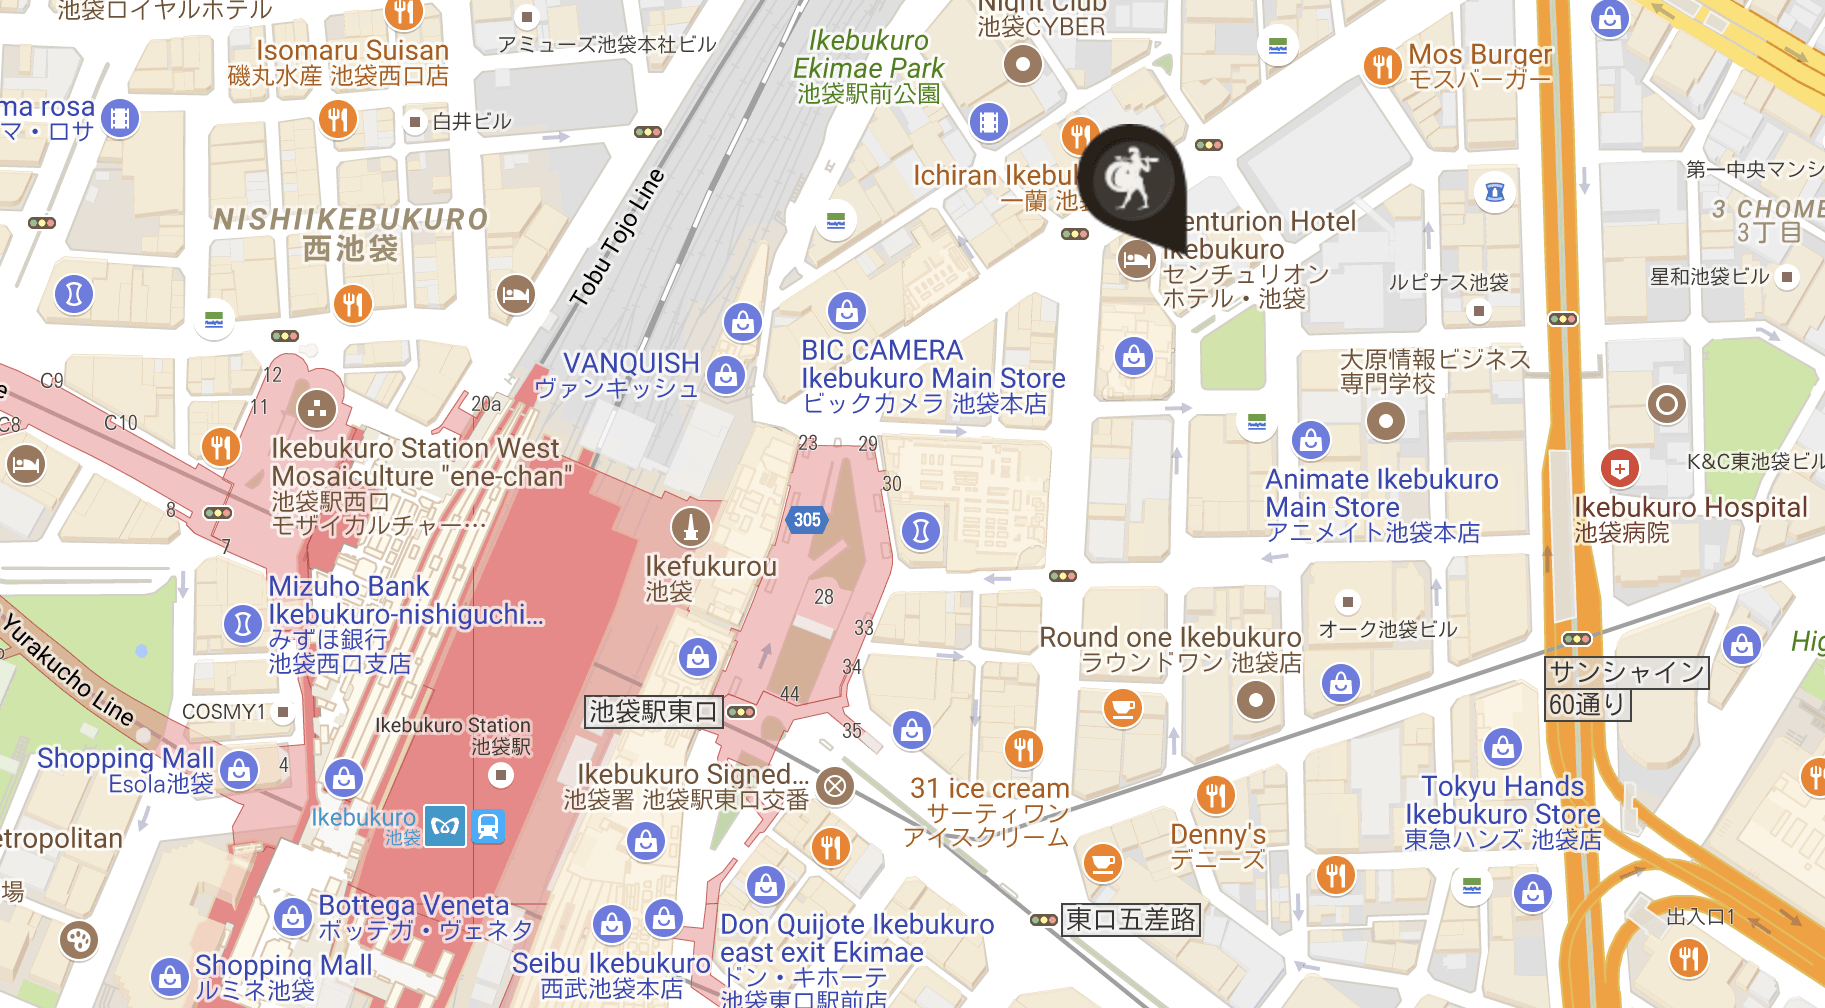
Centurion Hotel Ikebukuro is part of a chain of hotels and cabins in Japan. It is situated in Ikebukuro, Tokyo, a few minutes walk from East Exit of Ikebukuro Station.

screen-shot-2017-07-10-at-11-59-17-am.png

centurion2-2-e1499659920372.jpg

The entrance to the hotel is just beside the 7-11 in the ground floor but you have to take the lift to the 3rd floor for their reception area. The staff that greeted us spoke little English, good enough to get by. But it did take a while and a lot of hand gestures for them to finally understand that I was inquiring whether my package arrived at the hotel or not.

Room

I knew that hotels in Japan were small so I didn’t expect much. The room we got was, I think, a twin room with a pull-out couch which accommodated 3 guests. It was a little cramped but we had enough room for our 3 luggage and enough room to walk.

Centurion4.4.jpg

The room had a big TV (sadly, all channels were in Japanese) on the foot of the bed, a small fridge and a small cabinet with yukatas and slippers.

The bathroom was also small and compact, it didn’t bother me too much. It was also well stocked with shampoo, conditioner, body wash, facial wash, a complete skin care line, and other amenities. The one thing that amazed me was their electronic toilet, I have heard of these TOTO toilets that have electronic bidets and seat warmers but this was just awesome – no more ice cold seat in the morning (hahaha!).

Amenities

The room we got was non-smoking but if you are a smoker, you can always opt to reserve a smoking room or just go to their smoking area just beside the reception desk and lobby.

They also have vending machines located in the 3rd floor. Also located near the lobby is an area where you can do your laundry.

Breakfast

Complimentary breakfast served is down in the 2nd floor Denny’s. They served the usual breakfast food you can choose between Japanese style or Western style breakfast. You can choose from different kinds of main dish plus a choice of side with either coffee, tea or soda. I personally like the rice meals more than the ones that serve bread because at least the rice and soup was served hot.

Other than the breakfast combos offered, you can order other food or desserts but I don’t think it is covered with the complimentary breakfast ticket.

Internet

I also choose accommodations based on whether they offer free wifi in the rooms or in the lobby. It’s a good thing the hotel has free and fast wifi in every room. You can also opt to rent a pocket wifi for 500 yen per day from the reception area.

Location

Centurion Hotel Ikebukuro is located in 170-0013 Ikebukuro 1-8-9, Toshima-ku, Tokyo, Japan. It is approximately ~3-5 minute walk from the East Exit of Ikebukuro station. It was a short walk from the station and is surrounded by different shopping malls and stores. For more inquiries, call them at 03-6912-6031.

edited_df1.jpg

Of Books and Coffee


IMG_9869.jpgA book in hand paired with a nice cup of hot coffee or tea is perfect for a rainy day. What better place to spend the afternoon than the recently opened Books & Brews Cafe. The cafe is situated in the Ground floor of Mango Square Mall, just across the parking area.


IMG_9876.jpg

The place looks simple with white and black details. The one thing that catches your eye when you enter is the shelves of books lining the walls. You are free to borrow and browse through the books but be sure to return them once your done. A definite heaven for book lovers like me.

Check out their selection of tea, coffee and sandwiches. Their sandwiches are a bit on the small side but they serve it with a nice portion of nacho chips and salsa.


IMG_9872

They also have pies, cookies and cakes. I personally like their pies – the apple pie is delicious, albeit small.


IMG_9879.jpg

Overall, I like the place. It is cozy, spacious with 2 sofas and plenty of tables, plenty enough for a big group and they have a good selection of books to read. So what are you waiting for? Grab a book and a nice cup of coffee and maybe a pie or two, and spend an afternoon in Books & Brews Cafe.


Tips on surviving flights

Everyone loves flying to a new place for the holidays. A new country or city. New food. Meeting new people. What’s not to love? But before you go to that holiday to a land far, far away, you’ve got to get on a plane.

The thought of being stuck in a small, uncomfortable seat for any more than 2 hours is something I really hate about traveling. Unless you reserved a seat in the first class or business class, you probably are stuck in a tiny space with little leg room, squashed between other people.

These tips and tricks will make your next flight (long-haul or not) bearable and more comfortable.

StockSnap_GTWDOOQCKR.jpg

  • Book your seats reasonably
    • Window seat or Aisle seat? Both have advantages. Window seats are preferred for those who don’t want to be disturbed or what to see the nice view from the window. While aisle seats, have more leg space and easier to get out of your seat, the downside is having to get out of your seat every time someone from the window or middle seat wants to get out of their seat.
    • Emergency exit seats have more leg room but it requires you to be able bodied and ready to assist in cases of emergency. Also you can’t store your bag under the chair in front of you.
    • Bulkhead seats also have a lot of leg room but this is usually where families with babies in bassinets are seated. Also you don’t have any space in front of you to store you bag.
    • The front of the plane is usually quieter. Middle of the plane is louder, because you are seated nearer the engines but has a smoother ride. Back of the plane is   both noisy and bumpy and is usually where the toilets are located.


  • Dress comfortably
    • Looking good vs being comfortable? Comfort definitely wins in my book. It’s not worth the hassle walking around in heels, tight uncomfortable clothes and bringing a lot of unnecessary bling while you’re walking in the airport or running to your connecting flight.
    • In all my travels, I usually wear my comfiest jeans/ jegging/ leggings with a comfy shirt and jacket, flats or sneakers. I wear the heaviest items I have such a sneakers and jacket instead of putting it in my baggage, to save space.
    • I also avoid wearing belts or any metals on me while passing through the security checks just to make it less of a hassle of removing/re-wearing it.
    • Also, wear socks just in case they ask you to remove your footwear. This used to be done, but so far I haven’t experienced having to remove my shoes or metals while going through security. While except for Japan, they ask you to remove your belt, any metal accessories, and empty your pockets before they pat you down.


  • Bring your comfy gear
    • Packing your airplane essential items is a must for a comfortable ride. Earplugs are amazing for blocking any unwanted noise and giving you a restful sleep. Eye shades are also useful to have especially if you are one who can’t get a shut eye while the lights are on. Neck pillow can give you support while you sleep and is more comfortable than the airline pillow they provide. Scarf is also an item I always bring with me, not only does it double as a blanket it also keeps me warm while on the plane.

  • Stay hydrated
    • Airplanes are very dry and it definitely seen on your skin. The best way to hydrate is to drink up! Water and juices is available on most flights. Avoid alcohol or caffeinated beverages since these drinks can cause you to get dehydrated faster.

  • Personal toiletries
    • Spending hours on a flight with smudged makeup, oily skin, grime and dirt added with dry, flaky skin due to dehydration can making you look tired, worn out and isn’t going to make your flight anymore enjoyable. That’s why you should pack a small toiletry bag with you.
    • A small travel sized toothbrush, toothpaste and your facial products can make you feel and look refreshed after a long flight.


  • Headphones
    • A good pair of noise cancelling earphones or headphones are essential, not just for travel, but for daily life. I find that I can enjoy watching a movie or listening to music more because I can focus more on the music or movie rather than the chatter or crying around me.


  • Personal entertainment
    • Not every flight entertainment system will cater to your needs. If you find the in-flight selection of movies or shows too boring. Or in my recent trip, the flight did not offer any entertainment unless you rent their limited ipad or pre-downloaded their in-flight app, you will be stuck doing nothing or just sleeping. So to avoid boring yourself to death, prepare your own entertainment by loading up on your favorite movies, TV shows, music or ebook.


  • Snacks
    • Most flights offer in-flight meals and drinks but what if you get hungry in between? Small snacks such as peanuts, chocolate, snack bars, chips or even jellies make for a light snack. Just make sure the snacks you bring are not the type that makes a mess or has a strong, offending odor. You wouldn’t want to stink up the whole cabin, now would you? Or you could simply ask for a light snack from the cabin crew.

Useful apps to have for your Japan travel

While I’m on the topic of traveling to Japan, I want to share a list of useful apps I personally used during my travel. Since I always have my smartphone with me I found it convenient to install applications on my device rather than buying a guidebook or getting a map. So these are a few of the apps I found useful during my trip.

Rome2Rio

This is a trip planner that helps you navigate the country you are in. It instantly displays different routes via flight, train, bus, ferry or driving options in getting from point A to point B in the quickest way possible. It also displays estimated travel time and fares. Rome2Rio is available in both Apple and Android devices.

Hyperdia

This is a train timetable application similar to Rome2Rio that shows a complete timetable of all kinds of transportation. All you need is to click on the date, time and mode of transportation you want to take to get to point B, and the app displays different routes you can take with the corresponding departure and arrival time of each transport. Then you can choose which route you prefer based on the number of transfers you need to do, total cost and total travel time.

The Hyperdia  by Voice is similar to the regular Hyperdia app but is only available to iphones. It is a voice recognition software that sets the parameters of your search automatically and provides you with direct access to the train timetable.

You can download the app in your Android device, while for Apple devices you can download the Hyperdia by Voice which is only available in selected countries.

GoogleMaps

Google Maps is a widely used navigation app not just in Japan but all over the world. Similar to the previous apps this shows you different routes you can take to get to your destination. By clicking on your intended destination you can choose from different routes such as via car, train, bus or by foot with the corresponding estimated time. And by selecting the route you are given instructions as to train line, platform, or direction you need to follow to get to your destination.

I personally found this the easiest to use and is my go-to app in all my travels.

Maps.Me

Maps.Me is an offline version of google maps so you don’t need internet connection when using this app. It is available in both Google play, Apple app store and Blackberry. You do need to do an initial download of the area map, it is best to do this when you are in your own country and connected to the internet. Once you have completely downloaded the map, you can now use navigation, search and other functions while offline.

Google Translate

This app is a life saver in situations where there are no English signs. All you need to do is take a picture of what you want translated and it automatically translates it to English or to your chosen language.

GuruNavi

GuruNavi is an easy to use “food/ restaurant/ cafe finder”. All you do is select your location and select what kind of cuisine you are looking for. You can also filter your search to restaurants offering an English menu, free Wifi, smoking or non-smoking, etc.

Other apps you may want to check: TDRnow – Disney app that shows wait times for Tokyo Disney Resort, Navitime, Japan Travel Guide with Me.

*You definitely don’t need to get all these apps, you can just choose which one you think is the most useful for you. I find Maps.Me or Google Maps as a must especially if you are a first time traveller.

How to Apply for a Japan Visa

Traveling to Tokyo, Osaka, Kyoto, Hakone or anywhere in Japan has always been a dream of mine. Nowadays, flying to Japan is now more affordable with the rise of low-cost or budget airlines such as Cebu Pacific and Vanilla airlines. Aside from that, Japan has also relaxed their visa policies. So here are tips on how to apply for a Japan visa if you’re a Philippine passport holder, like myself.

unadjustednonraw_thumb_104c.jpg

Decide what kind of Visa you plan on getting

I personally applied for a tourist visa so I’m going to focus more on that in this entry. There are also other kinds of visas you can apply for, such as:

  1. Visa for Tourism
  2. Visa to visit friends/ distant relatives
  3. Visa for visiting relatives
  4. Visa for commercial purpose
  5. Visa to attend conference by Private or Public Organization
  6. Visa to visit relatives invited by US Military Personnel
  7. Visa to visit spouse of a Japanese National
  8. Visa for Spouse of a Japanese National
  9. Visa for an Official or Diplomat
  10. Visa for house servant hired
  11. Visa for application with Certificate of Eligibility Issued in Japan
  12. Visa for Transit
  13. Visa for Medical Stay
  14. Visa for Nikkei-Jin
  15. Visa for Filipino parent of Japanese-Filipino Children
  16. Single-entry tourist visa for Philippine Nationals joining Package Tours
  17. Multiple Entry Visa

Prepare your requirements:

  1. All documents must be original.
  2. Philippine passport
  3. Visa application form. This can be printed form the Embassy website, click here, or from any accredited agency. Fill up the form completely and truthfully. The embassy may not accept application forms with blank items, no signature or no date; and may deny the application if it was incorrectly filled out.
  4. Recent photo. The photo must be 4.5cm x 4.5cm, with white background taken at least 6 months from application date. Be sure to write your name and birthdate on the back of the photo.
  5. Birth certificate. It must be issued within 1 year from the Philippine Statistics Office.
  6. Marriage certificate (if applicable).
  7. Daily itinerary. The itinerary should cover your entire stay in Japan. It should show your daily activity plan and complete address of your accommodation. Sample itinerary.
  8. Bank certificate.
  9. Income Tax Return.
  10. If a guarantor will shoulder part or all of the applicant’s travel expenses:

Guarantee letter.                                                                                                                     Proof of relationship between applicant and guarantor (e.g. Birth Certificates etc.) Bank Certificate (original) and Income Tax Return (ITR Form 2316) (clear Photocopy) of Guarantor.

* Please use A4 size paper in printing your documents.

Apply from an accredited travel agency

In applying for a visa, personal appearance is not needed. All you have to do is submit your complete requirements to your nearest agency. In Cebu, there are 3 agencies located in the city. For my last trip to Tokyo, I used Friendship Tours & Resorts Corp in Oakridge Business Park in Mandaue City. We submitted our requirements, paid the fee and got our visas in about a week. There are some people who received their visas in less than 2 – 5 days if you applied during the start of the week, on the other hand give at least a week if you applied during the weekend since they don’t send out the forms during the weekend.

Discovery Tour,Inc. Door No.203-A1 2nd Flr.Northgate Center, Don Manuel Gotianuy Complex, Gov.Cuenco Ave., Banilad City, Cebu. Fee: 800 php.

Attic Tours Phils., Inc. Lobby,Waterfront Airport Hotel 1 Airport Road,
Lapu-lapu City, Mactan Island, Cebu. Fee: 1,500 php.

Friendship Tours and Resorts Corp.  Unit 215A Business Center B, Oakridge Business Park,  880 A.S. Fortuna St., Banilad, Mandaue City. Fee: 1,200 php.

For a complete list of accredit agencies in your area, click here.

Make sure you have enough in your bank account.

You will need to provide a copy of your bank certificate and ITR. It’s best to have enough money, at least 100,000 php in your account should be enough. You should have had this amount at least 6 months to a year, a sudden and recent infusion of money in your account may raise a red flag.

Show proof that you will return to the Philippines after your stay in Japan.

This can be in a form of employment certificate, letter of leave of absence, an ITR, or travel history such as old passports.

UNADJUSTEDNONRAW_thumb_e0a.jpg

Remember, submission of requirements does not guarantee approval of visa but so far I haven’t heard of someone getting denied, but to be in the safe side make sure you provide all the necessary documents needed.

Once you get your approved visa, you only get a 15-day single entry visa for first time visitor. On your second application for a visa, if you get lucky you may get the multiple entry visa.

Given the ease of applying for a Visa and the advantage of having it in your passport there is no reason not to plan a visit to the Land of the Rising Sun.

I think Spring and Autumn is a beautiful time to visit Kyoto and Osaka, you can experience Golden Week during Spring or you can enjoy the autumn foliage of yellow and red during Autumn.

Year-round however, Japan is a must visit. It has a mix of modern and traditional sites, amazing food, and for the kids at heart, different theme parks. So what are you waiting for? Visit Japan with your family or with friends or, if you dare, solo, and start exploring the wonders of Japan!

A Guide to Renting Pocket Wifi in Japan

Exploring a new country is usually a scary and exciting thing, what with getting lost and what not, but it gets easier when you have the right tools to help you navigate this new place. The tried and tested guide maps are always useful, you can find maps in the airport or in hotels. But in this day and age, isn’t it more convenient to bring a smartphone while navigating the new area? Apps such as Google maps, Rome2Rio, Japan Rail, Navitime, and many more can be downloaded and accessed on your mobile phones while traveling but to do so you need to be connected to the internet.

If you’re visiting Japan, a portable Wifi is a great idea rather than buying a SIM in the airport or signing up for roaming on your mobile. Sure cafes, restaurants, train stations and other establishments also have free Wifi access but wouldn’t it be more convenient to have be constantly connected to the net while on the go?

Before going to Japan and getting a pocket wifi, you should consider:

When are you traveling to Japan? This is important since you have to reserve your pocket wifi before you arrive at your destination. You can reserve a unit as early as a month or at least 2 days from the day of your arrival in Japan, this is just incase the provider you chose has no available unit to rent you can always try another provider.

How many days are you in Japan? This is because you rent the unit in a per day basis.

Internet usage You can choose which rental plan you want to avail depending on how heavy your internet usage is. Global Advanced Communications offer different kinds of rental plans such as ECO Wifi (21 mbps unlimited data), Standard Wifi (75 mbps unlimited data but after 10GB speed will be slow down to 128kbps), Premium Wifi (75 mbps unlimited data) and the Super Premium Wifi (187.5 mpbs unlimited data). During my last Tokyo trip, I personally, used the Premium Wifi plan from Global Advanced Communications (GAC) and had no problem during the duration of my stay in Tokyo. If you are a heavy user, you might want to bring or rent a power bank in case the battery runs out.

So, you are now ready to place a reservation for your Wifi rental, what steps should you follow?

From personal experience, I can only comment on Global Advanced Communications (GAC). These are the steps I took from reservation, pick-up and return of the item.

After you place your order, they will email you and check if the item you reserved is available.

Screen Shot 2017-06-03 at 11.08.11 PM

You’ll receive an email afterwards confirming your order and payment.

Screen Shot 2017-06-03 at 11.21.30 PM.pngScreen Shot 2017-06-03 at 11.23.13 PM.png

  • Pick up from airport or hotel/ hostel/ airbnb

For those who opt for hotel/ hostel/ airbnb delivery, just pick up your package in the front desk. Be sure to ask if there is a package delivered to you, because sometimes they aren’t aware. While for those who opt for airport pick up, take note of the office hours of your location. Post offices in Narita close by 2000H while those in Kansai close by 1700H. If your arrival flight happens to be beyond those hours, get the Premium Airport delivery package from GAC. For more information, click here.

  • Setting up your pocket Wifi

 These are what you will receive:

         1 prepaid return envelope, 1 pouch, 1 pocket wifi, 1 cord and adapter

IMG_9471

Setting up your wifi is easy.  Just check the SSID code and key indicated at the back of the device and connect to your smartphone. You now have internet connection! 🙂

  • Returning the item

              When returning the item be sure to insert the pocket Wifi, cord with adapter and manual into the pouch. You can then mail the items using the prepaid envelope provided by GAC. You can drop off the package in any post office within the city or you can drop it in the airport post office. For locations of the post office in Narita Airport, click here.

Renting a pocket Wifi in Japan is really easy and it saves a lot of trouble. So if you haven’t yet, go and rent one before your flight to Japan. Have a safe trip! 🙂

* This review is based on my personal experience. 🙂

Tips before going to Japan

Japan has a distinct culture just like any other, and it is one of the main reasons why it is such a fascinating place. It is a modern country that has not forgotten its traditions. Here are a few of the things you should know to make the most out of your travel.

Keep quiet in trains

Train rides in Japan can range from relaxing to rush hour madness, but you will quickly realize that even during rush hour everyone, most of the time, are really quiet. Majority are quietly on their mobile phones watching videos using their earphones or just surfing the net. But this doesn’t mean you are not allowed to talk, just keep your voice to a minimum, be polite and don’t shout or talk on your phone.

Trains and the station get really crowded

The best way to enjoy traveling from one landmark to another is by train or subway, but stations can get confusing especially if it is your first time. Be familiar with the route you are taking, which train lines you are getting on, which platform and where are your stops. People walk really fast in the station and this just adds to your confusion. If in doubt, or lost, ask any train attendant for directions they will be glad to help.

Brace yourself, during rush hour the trains can get really packed. It is best to stow your bulky luggage on the overhead racks or transfer your backpacks or bags in your front to avoid occupying more space. And when the time comes to disembark the train, just say, ‘excuse me’ and head towards the door, most of the time they will make way for you.

Tickets vs IC cards

Now you know which train lines you are going to take, what’s next is knowing how to buy the ticket. Ticket machines are found in the sides near the ticket gate. Above the machines is a train map showing you the different stations with the corresponding amount. Beside the regular ticket machines are machines selling IC cards, some selling PASMO, some selling SUICA, while most sell both. Getting an IC card is more convenient than buying a ticket every time you want to ride the subway or train, plus you can use your IC card in buses and paying vending machine or in convenience stores.

No smoking or littering

There are designated smoking areas public places and even in buildings, so please don’t just light up anywhere.

Trash bins are hard to find in Japan. In most food stalls and convenience stores they provide bins nearby, but while walking the streets I had a hard time finding a bin. So keep your trash in your bag until you find a bin or until you get to your hotel.

On a side note, segregate your trash properly, most trash bins have signs on them for segregation.

Restaurants have a smoking section and a non-smoking section

All the restaurants I have been to offer both a non-smoking section and a enclosed smoking section.

Clean up your mess

Most fast food restaurants I ate at didn’t have employees cleaning the tables so we had to clean up after ourselves after eating.

Tipping is not necessary

There is no tipping custom in Japan. If you leave money on your table you will just find an employee running after you to return you change. So remember, no tipping necessary, just a Thank You is enough.

Stand on the Left side

You will notice that people always walk on the left side of the street. They also stand on the left side of the escalator, because the right side of the escalator are for those walking or in a hurry.

Bring Cash

A few places do accept credit cards, but Japan is still mainly a cash based country. So it is better to change you money before traveling to Japan. Or if you are strapped for cash, you can change your money in the airport, in convenience stores with international ATMs or in the bank or post office.

Automatic toilets

Every public toilet I have been to, and the hotel rooms, are equipped with automated toilets that have heated seats, play music while doing your business, built-in bidet, flushers for water conservation, and etc. It may all seem new to you but don’t fret, there are english translations posted as a guide on how to use the toilet.


Late night thoughts

Have you ever wanted something so bad and prayed for it so hard that day and night, that it is what’s keeping you awake at night? That is what I was going through for almost 10 months while I was reviewing for the board exams.

“10 months?! I thought review only lasted 4 months or less?”, you ask? Well, let me explain.

For 4 months I stayed in the in-house dormitory of my review center. Afternoons were reserved for our 3 times a week review/ lectures, while we had the rest of the day/ week studying on our own at our own pace. I wouldn’t call my self a good student, I wasn’t particularly studious. I can honestly say I rarely read as much as the people in my dorm. I attended all the lectures, listened intently and wrote down notes when needed. I read a few reviewers for subjects I wasn’t good at, particularly Biochemistry, Physiology and Pharmacy, while I read the mother books for the major subjects. Shockingly, I was particularly fond of reading Solis for Legal Medicine, albeit, I only read it once. But yes, I did read the books when I had the time. But no matter, how much I read the books, browsed through the review questions and mock board exams somehow I wasn’t confident enough. No one ever is.

The pressure of the boards, the constant studying, and my personal problems were just too much for me so at the last few weeks leading to the exam, I decided to postpone taking the September exams and wait for the March exams.

I took a break from all the studying and waited for the next batch of review. I thought I would be more studious, but I was wrong. I did still attend lectures and read the books, but I didn’t stay late at night as others did just to get all my reading done. While people compared how much they’ve read or how many books they have finished, I just finished reading a few number of books, concentrating on the basics and must knows and watched Kaplan videos when I was bored. Listening to the same review material did get boring, tbh.

I couldn’t delay the exams any longer so I registered. Exam day arrived, at last. I went into the testing site with a “I hope it goes well”, “At least I tried my best” attitude. And as I answered through one subject to the next, I noticed how little of the questions were taken from our review materials. Some questions were basic stuff, a few were repeated from previous exam, while some questions just got my friends and I scratching our heads wondering where they took the questions from and which materials did they use? On the last day, people were taking longer in answering, and at the last exam a few had eyebrows scrunched up, eyes just staring at the paper waiting for it to spit out the answers while a few, as what I heard, had tears welling up in their eyes. After the 3 crazy days of exams, we were confused, angry, exhausted and was just too tired to do anything else but sleep. My friends and I had dinner and a movie to keep our minds off of the results, but the day did come.

The day when they post the list of all the successful examinees was a day that our phones was logged to the internet and the website was refreshed countless of times. And when you see your name there you just breathe a sigh of relief that you don’t have to go through that again. Ever. Hahaha.


Do I regret delaying it? Part of me says, Yes. But a part of me says, I did what was right at that moment. Or maybe, I did it because I was afraid of the outcome and afraid of where to go from there…

But one thing is sure, I am thankful for the people who helped me get my license. The doctors who took time out of their busy schedules to teach us and the my parents who helped me through out everything. I think just getting the license is just the beginning of something much bigger and harder than medical school and internship…

A year of hardships


‘Internship’ is the last year of medical school. Before graduating, one has to complete months of internship in various departments – Surgery (General surgery, ENT, Neurosurgery, Ophthalmology, and Orthopedics), Obstetrics & Gynecology, Internal Medicine, Pediatrics, Psychiatry, Radiology, and Community and Urban Medicine.

One rotation is not like the other, some are okay while some are a bit more challenging – physically and emotionally.

Having completed internship and post-graduate internship I can say that it is something that I am happy to have gone through and would not want to go through again.

So, to the lucky incoming batch of clerks, congratulations! Your hardships for the last 3 years are definitely worth it. Bask in all that ‘congratulations’, ‘we’re so proud of you’s and, ‘you can do it’, because soon you will be entering the realities in the hospital – the sleepless duties, the previous/post duty look, the countless of codes per shift, the times when your residents and consultants would ask you questions you don’t know and the countless of times all you can reply would be a meek ‘I’ll read on that, doc’.

So all of you fresh meat out there, remember a few tips:

  • Make a good impression

Don’t be late, especially on your first day. Be properly oriented by the previous batch of interns few days before your first day. A one week leeway is usually allowed but after that, mistakes are usually not acceptable and may cause you a few days extension, if it may seem fit.

  • Bring a note pad

A small notebook, one that fits inside your pocket, is very helpful. Keep a few notes, ‘must knows’ inside & you can even the tidbits your seniors teach you for future reference.

I used to carry one notebook per rotation while I was a intern and PGI. It contained notes on what we should do in that particular rotation, some must know topics, computations, sample orders, medications, and some guidelines. You can always search guidelines or tables on the net, print it out and paste it on your notebook. It’s always better to be prepared. 🙂

* or you can use your cellphone if you have unlimited battery and data 🙂

  • Always bring a ballpen (or ballpens)

A black ball pen and few other extras is a must! You have to do a lot of writing – history sheets, PE, referrals and sometimes if your lucky order sheets 🙂 But mostly, you need a lot of extras for the times your resident borrows your pen because it is unlikely you are ever going to see it again.

*There was a time I put my ballpen down on the station while I was gathering all the charts I need to write orders on for the night, next thing I knew it was gone.

  • Patience (especially on the patient’s S.O and patients, of course)

Refrain from getting angry and fighting with your patients and their S.O. Always treat your patients like they are your family or just imagine how you want to be treated by a doctor, would you want your doctor to treat you badly? No, right? So treat all patients respectfully.

There may be times you won’t see eye to eye with them, but do your best to make them understand, and talk to them calmly.  Or if not, refer to your senior or the resident in-charge.

  • Read and Ask

I know being on duty or post duty status doesn’t leave much time to social, sleep and much less study, but always have a bit of time to read. Read a little about the cases you are assigned to because the resident will most likely ask you about it, so better be prepared. Also, don’t be afraid to say you don’t know or to ask your resident on topics you are not sure of.

*I rarely read during internship except during Ob-Gyn rotation and prior to OR..that’s something I regret.

  • Snacks in your pockets and list of numbers of fast food joints

I remember during my first few rotations of internship I rarely ate on time and if it was a busy duty I survived solely on chocolate, crackers, coke and ice tea and a lot of water just to fill me up until the next day. It’s not a good practice to skip meals but if your busy or don’t have the time to eat a full meal, it is better to bring a few snacks in your pocket while you are on duty.

And when you do have time to eat it’s better to have a list of delivery joints for your meals. When you’re too tired to walk out of the hospital to buy food, that’s when a Jolibee  or KFC or a dimsum delivery is heaven-sent. You’ll have a meal waiting for you after your rounds or OR.

  • Be respectful to everyone

Be respectful to everyone! From the janitor, to the guards, to the technicians, to the nurses, to the nursing aids, etc. Your life in the hospital will be much better. You may never know you might make a friend out of them. 🙂

  • Look out for your wellbeing

Remember you are in a hospital full of sick people, please follow universal precaution and proper hand washing. Wear your gloves and the proper masks (and other PPEs) when needed. This is to protect yourself, and to prevent the spread of infection to other patients you are handling.

But all in all, remember to have fun. Internship only happens once. You get to know your group mates better, you get to work with your friends, meet new people, and most importantly you learn so much about yourself and how to handle stressful situations.

So, ready your uniforms, your stethoscope and med bag, and your comfy shoes coz this is going to be a wonderful year. 🙂

*next thing you know the year is over and you’ll be PGIs soon and then taking the board exam 😉